health
Nail sticker beauty products
Nail sticker beauty products
13782 en stock
Envío gratuito — para pedidos superiores a 15€ el envío es gratuito
Llega en: 7-15 días
Mejoramos cualquier precio. Respaldamos todos nuestros productos con una garantía de un año.
Plazo de devolución de 14 días tras la entrega. Tiene dos semanas para solicitar un reembolso si el artículo llegó dañado o si recibió el producto equivocado. Consulte nuestra Política de Devoluciones y Reembolsos completa para más información.
No se pudo cargar la disponibilidad de retiro
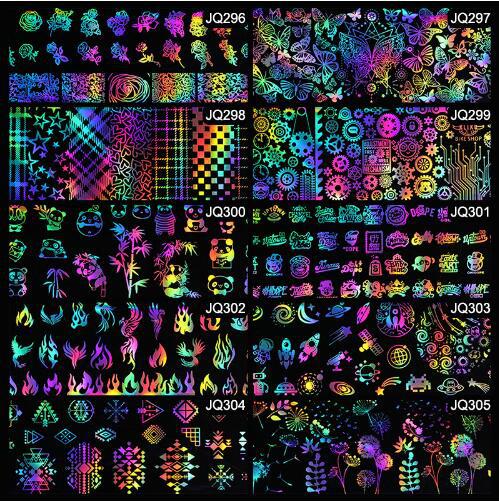
[Specification]: 1 meter in length and 4 cm in width
[Outer box packaging]: plastic bottle
【Instructions】:
First, [nail polish production steps]:
1, a thin layer of primer to make a base, the bottom oil has the advantage of preventing pigmentation and strengthening the adhesion between nails and nail polish
2, after the bottom oil is dry, apply the color nail polish, the color of the starry sky is the best in black.
3, the viscosity should be mastered by yourself, touched with your fingers, the surface is slightly dry, but the most suitable when there is a little viscosity
4, put the sticker on the nail surface, the desired color is placed in the desired position, using the , the three methods to make the size of the effect is different.
Note: The bright oil will affect the effect of the star sticker, try not to go up, but keep the time relatively long after the oil is on.
Second, [made steps of nail polish]:
1. First cut the starry paper into small pieces with scissors, not too big, about a small piece of 2--4CM. The same steps as the phototherapy nail polish, first apply the primer, and the phototherapy lamp is dry;
2, select the deep color of the nail polish (such as black, sapphire, red, etc.) painted two layers, put the phototherapy lamp to dry;
3, there is floating glue on the nail polish glue, take out the starry paper, and print it on the surface of the surface with the floating glue (pay attention to the action when printing),
Colors can be matched according to your needs. You can use two or three colors to make a starry sky.
4, after the color is glued, apply a layer of seal, the beautiful starry sky is finished... simple!!
Third, [Starry Glue Production Steps]:
1. First cut the starry paper into small pieces with scissors, not too big, about a small piece of 2--4CM. The same steps as the phototherapy nail polish, first apply the primer, and the phototherapy lamp is dry;
2, coated star glue, and other surfaces after the transparent color, no need to light
3, stick star paper
4, according to the lights, clean lights for 3 minutes, the beautiful starry sky is finished... simple!!
Bueno: este artículo vintage sigue siendo completamente funcional, pero muestra signos de su antigüedad a través de rayones, abolladuras, acabados descoloridos, defectos mínimos de tapicería o reparaciones visibles.
Descripción
Descripción
[Specification]: 1 meter in length and 4 cm in width
[Outer box packaging]: plastic bottle
【Instructions】:
First, [nail polish production steps]:
1, a thin layer of primer to make a base, the bottom oil has the advantage of preventing pigmentation and strengthening the adhesion between nails and nail polish
2, after the bottom oil is dry, apply the color nail polish, the color of the starry sky is the best in black.
3, the viscosity should be mastered by yourself, touched with your fingers, the surface is slightly dry, but the most suitable when there is a little viscosity
4, put the sticker on the nail surface, the desired color is placed in the desired position, using the , the three methods to make the size of the effect is different.
Note: The bright oil will affect the effect of the star sticker, try not to go up, but keep the time relatively long after the oil is on.
Second, [made steps of nail polish]:
1. First cut the starry paper into small pieces with scissors, not too big, about a small piece of 2--4CM. The same steps as the phototherapy nail polish, first apply the primer, and the phototherapy lamp is dry;
2, select the deep color of the nail polish (such as black, sapphire, red, etc.) painted two layers, put the phototherapy lamp to dry;
3, there is floating glue on the nail polish glue, take out the starry paper, and print it on the surface of the surface with the floating glue (pay attention to the action when printing),
Colors can be matched according to your needs. You can use two or three colors to make a starry sky.
4, after the color is glued, apply a layer of seal, the beautiful starry sky is finished... simple!!
Third, [Starry Glue Production Steps]:
1. First cut the starry paper into small pieces with scissors, not too big, about a small piece of 2--4CM. The same steps as the phototherapy nail polish, first apply the primer, and the phototherapy lamp is dry;
2, coated star glue, and other surfaces after the transparent color, no need to light
3, stick star paper
4, according to the lights, clean lights for 3 minutes, the beautiful starry sky is finished... simple!!
Información adicional
Información adicional
Estado detallado
Estado detallado
Bueno: este artículo vintage sigue siendo completamente funcional, pero muestra signos de su antigüedad a través de rayones, abolladuras, acabados descoloridos, defectos mínimos de tapicería o reparaciones visibles.
Pago seguro garantizado

¿Tienes alguna pregunta?
-
Monizora
¡Tu tienda de todos los días!
-
Únete a nuestro Instagram
Nuestra filosofía es sencilla: priorizamos la calidad sobre la cantidad. Menos, pero mejor. En un mundo acelerado y ruidoso, admiramos la calma y el silencio, el buen diseño y las cosas bien hechas.